Get started using html with flutter with one dependency
Have you ever wanted to import a small html page in your flutter, you was like ugh!!!, it’s just a pain in the ass that you can’t write a html in flutter, and you have to spend the rest of the 4 or 5 hours trying to figure out what to do.
Here’s what you should do is to download this really nice package and it does offer lots of functionality that helps you ease the pain of writing HTML code to be a flutter ones, instead you can write HTML codes directly in flutter. Let’s see how to use it.
This is the flutter_html flutter published page, and this is their github page, below I have mentioned a small summary of what it does and how it works and you do a lot with it.
Preview Of How It Works
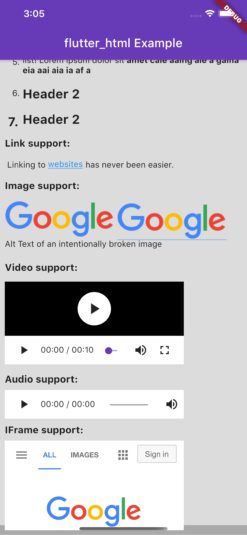
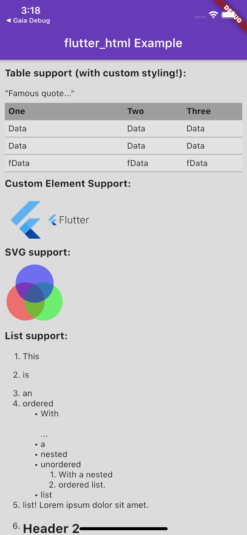
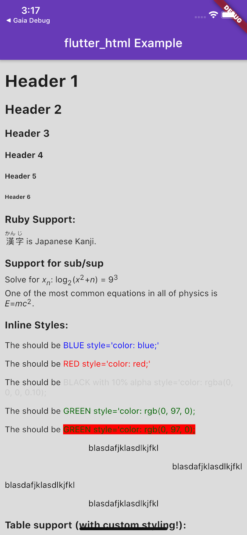
Here’s how it works and It is really different, exciting, also little weird, So let’s get going.
Installing flutter_with_html
So it’s really straight forward to install this plugin, use the codes that are listed out below
flutter pub add flutter_html
Or add this to your pubspec.yaml file and you are good to go.
dependencies: flutter_html: ^2.0.0
And run this command
dart pub get
So by now you should have installed the dependency and now all you have to do is that stop your build and rerun your build because when you add new dependencies to your project,
Then you have to rerun you build or else the change will not be displayed and this always happens to me, So let’s keep going.
Now you have got the dependency and reran your build, open the dart file that you want to have HTML.
A small tip, You have to start seperating your main.dart file into different files and folders like pages, utils, classes and for files like homeScreen.dart and customUser.dart (classes).
After you have opened the file add this import to the top of the file.
import 'package:flutter_html/flutter_html.dart';
Available HTML Tags In Flutter
Here are all the available HTML tags that you can use in your app,
- a
- abbr
- acronym
- address
- article
- aside
- audio
- b
- bdi
- bdo
- big
- blockquote
- body
- br
- caption
- cite
- code
- data
- dd
- del
- details
- dfn
- div
- dl
- dt
- em
- figcaption
- figure
- footer
- h1
- h2
- h3
- h4
- h5
- h6
- header
- hr
- i
- iframe
- img
- ins
- kbd
- li
- main
- mark
- nav
- noscript
- ol
- p
- pre
- q
- rp
- rt
- ruby
- s
- samp
- section
- small
- span
- strike
- strong
- sub
- sup
- summary
- svg
- table
- tbody
- td
- template
- tfoot
- th
- thead
- time
- tr
- tt
- u
- ul
- var
- video
- math:
- mrow
- msup
- msub
- mover
- munder
- msubsup
- moverunder
- mfrac
- mlongdiv
- msqrt
- mroot
- mi
- mn
- mo
Almost all the HTML are included, So you have nothing to worry about it and just a precaution, before you start check for the tags that you might need and go ahead, I will update this table
Once there is newer update or newer tags that are available in their repo.
Available CSS Attributes
- background-color
- color
- direction
- display
- font-family
- font-feature-settings
- font-size
- font-style
- font-weight
- height
- letter-spacing
- line-height
- list-style-type
- list-style-position
- padding
- margin
- text-align
- text-decoration
- text-decoration-color
- text-decoration-style
- text-decoration-thickness
- text-shadow
- vertical-align
- white-space
- width
- word-spacing
There is somewhat a decent amount of CSS attributes that are present and no worries the developers seems to be always updating the repo, I am sure there will be lots of updates
Currently Supported Inline CSS Attributes
- background-color
- border
- color
- direction
- display
- font-family
- font-feature-settings
- font-size
- font-style
- font-weight
- line-height
- list-style-type
- list-style-position
- padding
- margin
- text-align
- text-decoration
- text-decoration-color
- text-decoration-style
- text-shadow
I just wished there was flex atleast in there then it would have been great but am really so badly worried to say there is no flex and gridbox, So really sorry there.
Fun Stuff – Developing
If you want to start implementing a webview like page inside the app itself and let’s start then and I am really very much excited to share this with all of you mates,
Widget html = Html( data: """
My HTML Webview
Hello, welcome to the HTML webview page with flutter and let’s see how it works and how it performs.
Here’s how you should do it
- Check for any tags that you are planning to use are actually on our documentation
- Start the installation process.
- Import the package
- Boom! There you go
So what we have done is that we have created a new html variable with type of widget and We used the Html widget from the package.
Inside that we have used one of their parameters and I will list out the parameters and also link their documentation.
We have used a string with “”” triple quotations, so that because of some accidental “ quotation or something doesn’t escape the string,
Causes problem either during compile time and run time, and we have closed the tag
Now, coming to where to use it you can use it in the body of the scaffold or inside a center widget or a container anywhere that requires another widget and
I will show you a demo as well on where to use it, this will be really useful to beginners because when I started out I didn’t understood everything,
Widget html = Html( data: """
My HTML Webview
Hello, welcome to the HTML webview page with flutter and let’s see how it works and how it performs.
Here’s how you should do it
- Check for any tags that you are planning to use are actually on our documentation
- Start the installation process.
- Import the package
- Boom! There you go
Scaffold: { Body: html }
Here’s how I would use it and there you go we used, HTML with flutter ✨
Parameters For Html Widget
| data | The HTML data passed to the Html widget. This is required and cannot be null when using Html(). |
| document | The DOM document passed to the Html widget. This is required and cannot be null when using Html.fromDom(). |
| onLinkTap | A function that defines what the widget should do when a link is tapped. The function exposes the src of the link as a String to use in your implementation. |
| customRender | A powerful API that allows you to customize everything when rendering a specific HTML tag. |
| onImageError | A function that defines what the widget should do when an image fails to load. The function exposes the exception Object and StackTrace to use in your implementation. |
| omMathError | A function that defines what the widget should do when a math fails to render. The function exposes the parsed Tex String, as well as the error and error with type from flutter_math as a String. |
| shrinkWrap | A bool used while rendering different widgets to specify whether they should be shrink-wrapped or not, like ContainerSpan |
| onImageTap | A function that defines what the widget should do when an image is tapped. The function exposes the src of the image as a String to use in your implementation. |
| tagsList | A list of elements the Html widget should render. The list should contain the tags of the HTML elements you wish to include. |
| style | A powerful API that allows you to customize the style that should be used when rendering a specific HTMl tag. |
| navigationDelegateForIframe | Allows you to set the NavigationDelegate for the WebViews of all the iframes rendered by the Html widget. |
| customImageRender | A powerful API that allows you to fully customize how images are loaded. |
I have just copied exactly what was in the article so that it would be easier for you to stay at one place.
I will add an example for how you use one of these tags
Widget html = Html( data: """
My HTML Webview
Custom HTML Tags
Using custom tags are really easier and I will tell you how in the below code
Widget html = Html( data: """
Display an emoji from Artistic Programmer
""", customRender: { "myowntag": (RenderContext context, Widget child) { return TextSpan(text: "❤"); }, }, );We just need to use the customRender parameter as we already saw it. And set a variable name between those brackets
And assign a value to the tag in custom render as flutter widget and that’s all
Conclusion
So what do you think on this dependency whether this dependency is really worth it or is it just only for the look no functionality can be made, comment your views about it,
I would love to know about it. So thanks for staying till this part of the post.


